
I’ve got this, and It’s Fun

Welcome back for the last installment of building a book trailer on a shoestring budget. So far, we’ve looked at all the hard, irritating, boring parts of the process. Now, we get to see all of this come together.
In your video editing/creation software you should have all of your slides in place, and your music imported. Oh, and don’t forget to have your captions somewhere you can see them as well.
Click on your first slide, and add the caption you want for it. Right now we’re not going to worry about where the text shows up, so long as you can find it. Do this for all of your other slides as well, while you’re at it.
Once you have all of the captions added, now you can worry about the next two steps at the same time – placing the text and timing the text to the slide.
For mine, I’ll go back to my author slide, so it looks like this:

Notice here the bounding box? That’s what you want to make sure is in the right place. What looks like a shadowy extra image is from the previous slide and I’ll talk a little more about that in a second. Not all of your slides have to have text at the bottom. Some examples are:
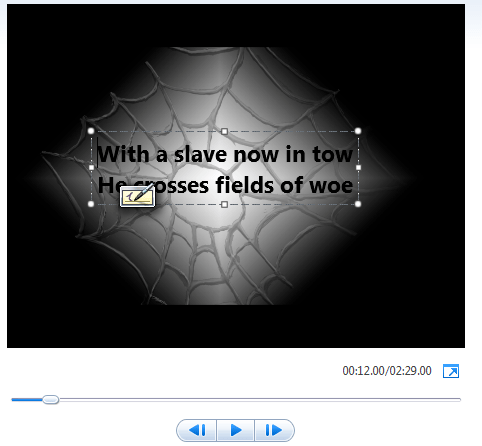
See how I’ve got the text in the center of the slide? I’ve also changed the text color and bolded it to help it stand out. Readability is as important here as it is in your book/blog, so make sure everyone can see the text.

For this slide, I elected to “bracket” the central image. This is the other main reason I recommend using your computer’s video software, rather than one of the free online video making software. Sometimes being able to place the text where YOU want it can dramatically increase the impact of what your words are saying.
Once you have all of the captions in place, your movie “timeline” will probably begin to look a little crowded. No worries, mine does too. In fact, this is a screen print of what I have going on for this video by the time I’ve finished everything:

Pretty intimidating, but don’t worry. We’ll break it down. Going back to the author’s slide, let’s take a look at what we have:

Across the top, in the light green bar is the music – for Windows Live Movie Maker, the song, artist, and any descriptives that were in the file title will show up at the start of each row. Then, the black is the slide itself. The gray “triangle” lets me know I’ve added an effect – the slide will shade in, and the bottom beige/cream box lets me know the slide has a caption.
You’ll note that I did not have the caption start right at the left edge of the slide, and that it extends past the right edge of the slide image. That is because of the timing. The caption starts after the slide is fading in, and will carry over into the fade in of the next slide. This has to do with my choice for the timing.
Before you add any effects, go ahead and preview play your trailer. As it goes through, watch the video playback screen, not the slide screen. It’s not as easy as it sounds, believe me. I keep having to play the entire trailer several times to see what I’m looking for.
What you are doing now is watching your video to see if the images shift in time to your music. They probably will have hard, jarring changes right now. Don’t worry. We’ll get into that in a second. Use this first watch through to see if your slides are even close to being in synch to the music. If they are, then smile – you’re lucky. If they aren’t, or if you are a perfectionist, then pull your music into your music player, and watch the timer as the music plays. Note down when there are major shifts in the music, or when the natural emphasis falls. THEN go back into your video editor.
Click on your first slide, and set the duration to how ever long you want it to display. Do this for the rest of your slides. Do this FIRST, then watch your developing video again. If your slides match up properly, then you can either do the same thing for your captions, or you can add your transition effects. I prefer to add the effects at this time.
When you add your animations (or other visual effects) make sure to check your duration times. For mine, I have yet to accept the default duration. So, I shorten it. For this trailer, I used half of the default duration. Just to the right of your animation choices, there is a little box – that’s where you’ll want to change the numbers.

Then, click apply to all. If you are only adding the animation to a certain group of slides, you can CTR+click the slides, and select them individually, or Shift+click the range. Since my first slide is not animated, and the last, all-black slides aren’t animated, I typically just shift+click. Feel free to experiment with the different animations until you find the one that feels right for your piece.
Once you have the animations, have watched your trailer AGAIN, it’s time to finish up the captions. From personal experience, I would not recommend a caption duration of less than five seconds, most of my non-end credit captions tend to have a six to six and one half second duration. The end credit captions I set to the length of the slide’s display – usually somewhere around 10 seconds. This is because those slides have a LOT of text, and I want folks to have a chance to read it if they want.
There are two ways to time your captions – you can drag and drop the left edge of the caption box to somewhere under the slide, or you can precision time it using the start/duration boxes in your tool bar. I prefer the precision method, though when I’m roughing out how the text will flow, I will use the drag and drop method.

This is also when you’ll set up any animations you want for your captions. For my slides with the text centered on the slide, this is what my settings look like. The first, cover slide displays six seconds, so my captions start at the 6 second mark, and then have a duration of six seconds. The slides themselves have a duration of six and one half seconds. So, I do not want the captions to start immediately with the slide. That is why, in this screen shot, you see the caption boxed off center to the slide:
Once you have your caption animations added (you’ll probably have to do this one at a time. A pain, but well worth it.) and your durations established, watch your proto-trailer one more time. Then, save it as both a movie AND a project. If you have a Facebook page, go ahead and upload the video to Facebook, and have your friends watch it. The project save is critical! If you save it only as a movie, you will NOT be able to go back and edit it. It’s like saving an image you’ve got in Gimp or Photoshop with all kinds of layers as only a jpg, then needing to go back and adjust one of those layers. If you haven’t closed the project, that’s not a problem. Once you close it, however, you’ve lost those layers unless you can recreate them. Same with the movie – once you close the movie file after you have created it, you will have to recreate your slides, timing, animations, effects, all of it. NOT what I’d call a fun day.
Once you’ve saved, proofed, had someone (or several someones) proof it again, now it’s time to release your video out into the big, wide world on which ever platform you prefer.
And, just because you’ve watched this whole project come together, here is the final product of my own efforts:
Thats it – Good Luck with YOUR Trailers and thanks so much for coming along, and putting in the work. If you want, feel free to contact me, and I’ll add your channels to my list.
Kat


Great post but can someone point me to the first in the series please!
LikeLiked by 1 person
Here are all the parts of the series, Meeks:
https://thestoryreadingapeblog.com/authors-resources-central/how-to-build-a-book-trailer/
LikeLike
Much appreciated, Chris! Ta 🙂
LikeLiked by 1 person
Welcome, Meeks 😀
LikeLike
I am planning to do it an even easier way. My hubby is a musician and a teacher. He has made many videos, several presenting the FLAGS program that he teaches for. He made my Kickstarter video, then later composed a song for my book. So, I hope to have him put the song in video format, then show me how to download photos from the net. El Salvador’s civil war is the most photographed war in history. (I am pretty sure that hasn’t changed.)
Anyway, I know it will be cheating, but I get very frustrated working on stuff on the PC whereas my hubby loves the challenge. No reason I shouldn’t take advantage of that, right? 😉 ❤
LikeLiked by 2 people
RIGHT Sherrie 😀 😀 😀
LikeLike
I agree, it can be frustrating to get everything to come together. This time, I got lucky in that the timing, the number of slides, and the music came together so nicely. I’ve had another project where that didn’t happen, and I had to hand time each image.
If you’ve got someone who’s good with this type of work – definitely take advantage of it! Making the images was almost as time consuming as timing them. I’m hoping that both parts of the process will get faster with practice.
LikeLiked by 1 person
Tip: If the music is too long, use the fade-out function to…fade it out lol – if the music is too short, splice it together to make it longer.
LikeLiked by 1 person
NOW you tell me. ::Grins:: At least I’ll know for next time.
Thanks Chris.
LikeLiked by 1 person
Great series! Shared 🙂
LikeLiked by 2 people
Thanks Tina 😀
LikeLiked by 2 people
Reblogged this on Smorgasbord – Variety is the spice of life and commented:
The final part of this excellent series on building your own Book Trailer by author Kat Caffee – very detailed and easy to follow.
LikeLiked by 1 person
Thanks Sally – Hugs 😀
LikeLike
Thank you so much. Glad you enjoyed.
And, thanks for the feedback on the process. I wasn’t sure how well I’d explained my thought process at times.
LikeLiked by 2 people
My pleasure.. clear as a bell.
LikeLiked by 2 people
Thanks for this.
LikeLiked by 2 people
You’re welcome. Feel free to experiment – this is just the basics, and I admit to still be on the learning curve.
LikeLiked by 2 people
Sure, no worries
LikeLiked by 2 people
Thanks for the four-part tutorial, Kat! I reblogged the first one, but the others will have to wait until I can type with both hands again. (I have no idea what I bumped into this time, but I fractured a bone in my arm, and now I have a brace on my right arm to match the one on my left knee. I’m slowly morphing into Darth Vader! Luke will be disappointed when Maury reveals that I’m his father! Who’d have guessed?)
LikeLiked by 1 person
Hope you heal soon Connie…
LikeLike
Welcome, Connie.
Glad you found it informative. I promise I didn’t mean to make it so interesting you hurt yourself. Worry about healing up, I’m sure Chris will be nice enough to let the series hang around a while.
LikeLiked by 1 person
I’ll be adding it to my Resources Tab this week Kat – I’ll also make a post about it 😀
LikeLike
Wow, and thank you so much!
You’ve actually surprised me speechless.
LikeLiked by 1 person
Oh, that’s OK then – I thought I’d gone deaf 😀 😀 😀
LikeLiked by 1 person
::Gapes like a fish on land::
LikeLiked by 1 person
😀 😀 😀
LikeLiked by 1 person
Fantastic, easy-to-follow instructions. Thank so much. 🙂
LikeLiked by 2 people
You’re welcome. I’m glad you enjoyed following along.
LikeLiked by 2 people
I did. I enjoy learning new things. Thank YOU.
LikeLiked by 2 people